apache反向代理tomcat获取用户真实IP

校内CAS单点登录的审计日志中,用户的IP地址一直是服务器地址。这个问题拖了好久,今天终于解决了。
通过追查日志的来源,发现是自己实现了一个appender配置在了log4j中。
从这个类入手开始追查代码,最终发现IP的来源是通过request.getRemoteAddr这个方法来获得的。
而这个方法是来源于tomcat自身的servlet-api提供,返回的向tomcat发起请求的客户端IP。

但是一般情况下tomcat都会用nginx或apache代理tomcat,所以这个方法得到的IP就是服务器自身的IP而不是真实的远程IP了
而我又不想更改CAS的源码重新部署,所以只能想办法更改tomcat,让tomcat得到真实的IP。
根据apache文档所述,proxy模块会自动添加这三个header。
但是还差两个header没有添加,于是引入header模块使用下面的指令设置剩下的信息。
RequestHeader set x-forwarded-by “IP”
RequestHeader set x-forwarded-proto “https”
由于我的服务器是https协议,所以写了https。

根据tomcat文档所述,在tomcat端的server.xml中
Engine级别下添加Value节点。

文档写的很清楚internalProxies指定的正则所匹配的地址不会在x-forwarded-by中出现,而trustedProxied正则匹配的地址会出现在x-forwarded-by中。
我想要的结果是真实IP为用户IP,同时添加校内服务器的ip地址进入x-forwarded-by中,所以理论上我值需要把服务器IP地址段的正则写入trustedProxied即可。但是实际测试结果依然不对。
getRemoteAddr方法返回的依然是服务器的IP而不是真实IP。

而如果我在internalProxies服务器IP地址段正则的话,getRemoteAddr返回的结果就是正常的,但是x-forwarded-by字段就看不见代理服务器的IP了。

同时更改tomcat日志的格式如下。

gradle入门中文教程

—————————下面是废话,可以忽略—————————-
第一次见到gradle是在写Android的时Android Studio下方的提示,那时候还没有仔细研究。第二次是在搭建校内中央认证的时候,由于需要研究代码不得不从源码导入idea,但是官方只有一堆源码,没有任何idea的项目文件。idea的依赖是存在.idea文件夹下的xml中的,而这个项目的依赖都写在了gradle文件中,当时费了好多时间才把官方4.2.0的源码成功导入,手工解决各种依赖问题,我高估了idea,还以为它能解析gradle并自动识别各种依赖呢,事实证明它确实能导入,但是依赖的级别都是错的或者有丢失。(顺便吐槽一下,如果一个jar中的依赖缺失是不会报错的,手动微笑)
官方文档居然一点提示都没有→_→后来偶然发现build.gradle文件中有这么几行

瞬间脑洞大开,想到当时写QQ机器人时候用的boost库的安装,是先根据需要生成不同版本vs的sln文件再导入到vs中,怀疑这个会不会一样的套路。

由于还看不懂build.gradle的语法,但是大概猜到意思是所有的项目使用了这几个插件,于是去gradle文档翻了翻,果然看到了这个文档

原文:The IDEA plugin generates files that are used by IntelliJ IDEA, thus making it possible to open the project from IDEA (File – Open Project). Both external dependencies (including associated source and Javadoc files) and project dependencies are considered.
意思是说这个插件可以生成idea所需的文件,让这个项目可以通过idea打开。

啊~~我花了这么长时间都在干些啥,再次鄙视CAS官方没在4.2.x文档写清楚,咳咳
今天特意上去看了下,4.2.x的文档确实没写,臻不是我没看到。我有句XXX一定要讲!最新版本的文档在开发者一栏增加了Build Process的教程传送门

论写好文档的重要性T T虽然我也懒的写(逃

—————————上面是废话,可以忽略—————————-

扯了这么多废话还是说正事吧,咳咳。

1.安装

要求:gradle可以在当前主流的平台上运行,仅仅需要jre或jdk7以上就可以。
如果你已经有一个使用gradle生成的项目,并且使用了GradleWrapper的话,就不需要安装任何其他的东西了,只要运行gradlew这个shell脚本就可以了,windows下为gradlew.bat,这个脚本会下载项目对应的gradle版本。但是我不推荐使用,国内的网你懂得。
windows上手动安装只需要下载这个包(传送门)然后解压即可。记的把bin目录加到环境变量PATH中。

Ubuntu上更简单apt-get install gradle,不解释了。

安装完成后运行gradle -v检查版本。
另外官方支持Zsh和Bash的自动完成脚本(传送门)

2.基本使用

如果你用过linux的make编译软件,那么你会比较容易理解gradle,感觉很像。
新建一个文件夹,里面放入一个名为build.gradle的文件,内容如下:

依赖关系如图(不知道能不能直接用官方图。。。如果不能自己点开吧)
图片地址:https://docs.gradle.org/current/userguide/img/commandLineTutorialTasks.png

进入命令行执行gradle dist,输出如下

每一个任务都有自己的依赖,当任务自己不依赖其他任务时候,就可以开始执行了,按拓扑序列执行所有任务,直到指定的dist完成。
如果想跳过某个任务,使用-x参数,例如gradle dist -x test跳过了test任务

默认情况下,gradle执行时候如果碰到有任务失败就会停下来,如果你为了尽可能多的发现错误,可以使用--continue参数。这时候如果有某个任务的依赖执行失败,那么这个任务也会被跳过。

当执行命令行时,可以使用任务名简写,只要给出的名字能确定唯一任务就行。例如di指的是dist,cT指的是compTest。

gradle tasks用来列出可以执行的任务列表。
gradle help --task someTask 用来查看某个任务的详细说明。
gradle -m someTask 用来查看某个任务的执行顺序,但是并没有真的执行。

3.Gradle Wrapper

大多数工具在使用之前要求你安装一些东西,如果他们安装简单那是最好的。但是如果像Hadoop安装一样繁琐,你就会感觉好气啊,怎么还不能用。更重要的是版本问题,如果版本不兼容怎么办?Gradle Wrapper同时解决了这些问题。
如果一个项目使用了Wrapper(官方建议每个项目都用),你可以像上文提到的那样使用gradle 来执行构建任务。(虽然我不推荐,因为网速实在是感人)

每个Wrapper都知道自己应该下载什么版本的gradle,所以不用担心版本问题。
这些文件很重要,不能删
gradlew (Unix Shell script)
gradlew.bat (Windows batch file)
gradle/wrapper/gradle-wrapper.jar (Wrapper JAR)
gradle/wrapper/gradle-wrapper.properties (Wrapper properties)

当通过Wrapper导入IDE的时候,IDE会使用Gradle的all版本,这可以帮助IDE更好的完成代码补全(个人建议安装的时候就下载all版本)
Wrapper下载的Gradle默认存放位置为
linux上为~/.gradle/wrapper/dists
windows上为C:\Users\<你的用户名>\.gradle\wrapper\dists

4.Gradle Daemon

From Wikipedia:
A daemon is a computer program that runs as a background process, rather than being under the direct control of an interactive user.

从3.0开始Gradle默认会启动一个守护进程,来减少每次build时候启动JVM的时间,并且可以在内存缓存项目相关的信息。
使用gradle --status查看守护进程
使用gradle --stop停止守护进程
在gradle.properties文件中写入org.gradle.daemon=false,并把文件放在默认目录下即可禁用守护进程。
linux上为~/.gradle/wrapper/dists
windows上为C:\Users\<你的用户名>\.gradle\wrapper\dists

5.依赖管理

大概来说,依赖管理由两步组成。Gradle需要知道你构建或运行项目需要的东西。第一步:找到它们,我们把这些文件叫做项目的依赖。第二步:Gradle需要把这些文件编译链接重组结构到你的产品中,我们把生成的文件叫做项目产品。

大多数项目的编写或测试都需要依赖其他的项目,例如为了使用Hibernate,在编译时候我需要把一些jar文件包含到我的classpath中,为了运行单元测试我需要额外的JUnit的jar包,还有就是JDBC数据库驱动等

这些外部依赖可能是远程的、本地的、子项目的等,Gradle需要知道这些依赖信息,并且把他们加载进来,我们把这个过程叫做依赖解析。

下面这段说的是Gradle比Ant更NB,不翻译了=_=好累.
Note that this feature provides a major advantage over Ant. With Ant, you only have the ability to specify absolute or relative paths to specific jars to load. With Gradle, you simply declare the “names” of your dependencies, and other layers determine where to get those dependencies from. You can get similar behavior from Ant by adding Apache Ivy, but Gradle does it better.

通常项目的依赖也会有他们的依赖,例如Hibernate的核心要求其他的几个库来运行,所以当Gradle运行项目测试的时候也需要找到这些依赖的依赖,叫做传递依赖。

大多数项目的目的是生成其他项目可用的库,例如Java Library,你需要生成jar文件或者包括源码和文档的jar文件并且发布出去。我们把这个过程叫做发布。
下面大概说Gradle非常关心你的用户体验,它能帮你把产品发布到任何地方(中文的博大精深)。
These outgoing files form the publications of the project. Gradle also takes care of this important work for you. You declare the publications of your project, and Gradle take care of building them and publishing them somewhere. Exactly what “publishing” means depends on what you want to do. You might want to copy the files to a local directory, or upload them to a remote Maven or Ivy repository. Or you might use the files in another project in the same multi-project build. We call this process publication.

示例代码:

上面的脚本声明了项目编译时需要Hibernate core 3.6.7.Final版本,言外之意是在运行时依然需要Hibernate和它自身的依赖。同理在编译单元测试的时候依赖junut4.0以上版本。同时它告诉Gradle在Maven中心仓库寻找任何其他需要的依赖。

Gradle依赖是分组管理的,一个配置组代表了一系列的依赖,Java插件定义了一系列标准配置。详见这篇文档

compile 这些依赖在编译时需要。
runtime 这些依赖在运行时需要,默认情况下已经包含了compile依赖。
testCompile 这些依赖在编译测试代码时需要。默认情况下也包含了所有编译后的class文件和compile依赖。
testRuntime 这些依赖在运行测试时候需要,默认情况下包含上面3个所有的依赖。

许多组件添加了很多标准配置,你可以定义你自己的配置,详见这篇文档.

示例:
外部依赖声明

第二个写法是简写
关于仓库设置不再啰嗦:原文传送门

(未完待续。。。。)

参考:http://wiki.jikexueyuan.com/project/GradleUserGuide-Wiki/
https://gradle.org/docs
https://gradle.org/getting-started-gradle/
https://docs.gradle.org/3.3/dsl/index.html
https://gradle.org/install
https://gradle.org/getting-started/creating-a-build
https://docs.gradle.org/current/userguide/userguide.html
http://www.cnblogs.com/davenkin/p/gradle-learning-1.html
http://blog.jobbole.com/71999/
http://blog.jobbole.com/72558/
http://blog.jobbole.com/72992/

CAS认证之数据库认证

原文:https://apereo.github.io/cas/4.2.x/installation/Database-Authentication.html

Database Authentication

当使用Maven WAR overlay部署的时候,数据库认证组件通过增加下面内容启用:

连接池

所有的数据库认证组件要求一个DataSource来连接数据库,强烈建议使用数据库连接池,c3p0库是一个很好的选择。

示例:
一个名为dataSource的bean必需定义

下面的属性可以用来配置数据库连接池

数据库组件

CAS提供了下面的组件来适配不同类型的数据库认证需求。

QueryDatabaseAuthenticationHandler

通过比较哈希过的用户密码来认证一个用户。利用设置好的数据库查询语句。

下面的配置将会被使用:

SearchModeSearchDatabaseAuthenticationHandler
通过用户名密码查询记录,如果能找到一个以上用户就可以认证成功

下面的配置将会被使用:

BindModeSearchDatabaseAuthenticationHandler
通过用户名和哈希过的密码尝试创建一个数据库连接来认证用户。

下面的例子没有执行任何密码加密,因为大多数JDBC驱动原生加密明文密码。注意,用用户名密码建立连接的能力是和认证等价的。这个handler是最简单的了,通常不需要配置。

QueryAndEncodeDatabaseAuthenticationHandler

JDBC查询handler将会把私有salt和密码用来用户验证,用公开的salt加密密码,假设所有的东西都在一个表中。 支持多轮迭代器和私有salt的设置。

密码加密方法,结合私有salt和公开的salt为哈希密码做准备。如果用了多轮迭代,第一轮迭代的字节码在再哈希的时候不会使用salt。最终的结果将会在和数据库比较之前转为16进制。

下面的配置将会被使用:

CAS认证策略

原文:https://apereo.github.io/cas/4.2.x/installation/Configuring-Authentication-Components.html

认证

CAS的认证过程和下面几个组件有关:

PrincipalNameTransformer
把用户输入的id字符串转换为Principal Name,用具体类型的Authentication Handler认证。

AuthenticationManager
认证子系统的入口点,它接收一个或多个凭证和代理认证,传给设置的AuthenticationHandler组件。它收集每次尝试认证的结果和决定安全策略的有效性。

AuthenticationHandler
认证单一的凭证并且报告一个可能的结果: success, failure, not attempted.

PrincipalResolver
转换认证凭据中的信息为一个安全策略,通常包括附加的元属性(例如用户细节:affiliations, group membership, email, display name).

AuthenticationMetaDataPopulator
设置关于一个成功认证事件的任意元数据的组件,通常用于设置具体协议的数据。

除非单独说明,这个配置所有的认证组件都在deployerConfigContext.xml中。

Authentication Manager

CAS提供了一个灵活的授权管理器PolicyBasedAuthenticationManager可以满足大多数需求,它根据下列步骤进行认证。

对每特认证凭据按照下列步骤执行:

1.遍历所有设置的authentication handlers
2.如果一个handler支持,就尝试验证凭据。
3.如果成功,尝试解析规则。
4.检查是否有一个已经为这个handler配置的解析器。
5.如果有合适的解析器,尝试解析。
6.如果没有找到合适的解析器,使用主解析器。
7.检查是否满足安全策略(例如any, all)。
8.如果满足立刻返回。
9.如果不满足,就继续继续

当所有的凭据都尝试过后,再次检查安全策略并,如果不满足抛出AuthenticationException。
这里有一个隐式的安全策略要求至少一个handler成功验证凭证,但是这个行为可以在之后的设置中被改变为下面任何一个。#setAuthenticationPolicy(AuthenticationPolicy)

AnyAuthenticationPolicy
任何一个handler成功就可以满足。支持tryAll的设置来避免在4.1步短路,这个策略是默认的,并且向后兼容。在CAS 3.x版本的AuthenticationManagerImpl中

AllAuthenticationPolicy
当前仅当给的所有凭据都成功的时候才会满足。支持多凭据,并且只在多阶认证情况下才会被接受。

RequiredHandlerAuthenticationPolicy
一个指定的handler成功验证的时候就可以满足。支持tryAll的设置来避免在4.1步短路。这个策略可以被用来支持多阶认证的情况。比如当用户名密码认证是必需的,但是附加的OTP是可选的。

Authentication Handlers

CAS 提供很多类型的认证系统支持,下面的列表完整提供了支持的认证技术,跳转到具体的章节查看详细信息。

Database
JAAS
LDAP
OAuth 1.0/2.0, OpenID
RADIUS
SPNEGO (Windows)
Trusted (REMOTE_USER)
X.509 (client SSL certificate)
Remote Address
YubiKey
Apache Shiro
pac4j

这里有一些附加的handler用于小型部署和特殊的场景:

Whilelist
Blacklist

Default Credentials
要测试默认认证,使用casuser和Mellon作为用户名和密码就可以了。

Password Encoding

密码加密负责在认证事件中转换和编码凭据中的密码到认证源可接收的格式。

Default Encoder

下面的设置可以被使用

Plain Text

参数提取

提取器负责从http请求中提取描述了认证请求的参数,比如请求的服务。提取器存在多个支持的认证协议,每个创建合适的 WebApplicationService类实例,里面包括了提取的结果

Principal Resolution

请看这个知道获得详细的信息

Principal Transformation

认证handlers通常处理username-password凭据,它可以被配置用来在执行认证前转换user id。下面的组件可以被使用:

NoOpPrincipalNameTransformer
默认转换器,实际上不做任何转换。

PrefixSuffixPrincipalNameTransformer
转换用户ID,增加前缀和后缀

下面的设置可以被使用了:

ConvertCasePrincipalNameTransformer
转换输入为全大写或小写,可以和前面的配合。

下面的设置可以被使用了:

认证元数据

AuthenticationMetaDataPopulator组件提供了可扩展的策略,可以注入任意元数据到认证子系统或其他子系统和外部系统 metadata populators一些使用:

支持长期认证特性
SAML协议支持
OAuth和OpenID协议支持

默认元数据populators应该满足大多数需求了,那些需要额外特性的组件他们应该额外的配置。

Long Term Authentication

CAS支持长期的TGT,登录时候“记住我”的特性延长了SSO会话的时间,并且超出了通常的配置,详见这个指导。

Proxy Authentication

详见这个指导

Multi-factor Authentication (MFA)

详见这个指导

Login Throttling

详见这个指导

SSO Session Cookie

详见这个指导

CAS安全指南

原文地址:https://apereo.github.io/cas/4.2.x/planning/Security-Guide.html

Security Guide

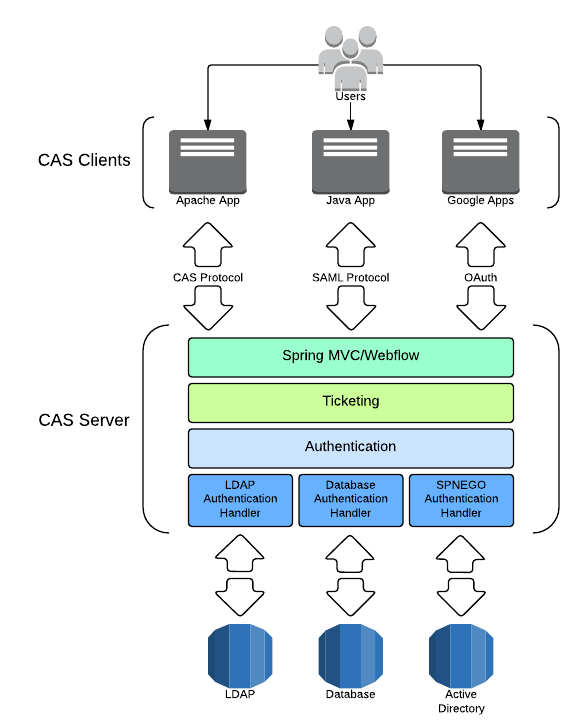
CAS是一个安全软件,它为基于Web的应用提供了基于Web的安全单点登录(SSO)。SSO同时保证了安全和便捷:把密码输入减少到单点,提供可信的凭证中间人来透明地访问多个应用而不需要多次登录。

系统安全
安全传输(https)
所有的交互必需使用安全频道,有两个主要的理由:

认证过程需要进行安全凭证的传输。
CAS的TGT是一个bearer token。
因为这些数据的暴露可能会遭到中间人攻击,所以CAS客户端和服务器传输的安全是极其重要的。

实际上,这意味着所有CAS的URL必需使用HTTPS,也意味着所有从CAS服务器到应用的连接必需使用HTTPS:

当ST通过service URL回传给应用时。
当访问代理(proxy)回调URL时。

依赖系统的链接
CAS一般要求连接数据库等其他系统,我们一般建议使用安全传输(SSL/TLS, IPSec),有严格访问控制的私有网络和企业网络是个例外,但是我们依然建议使用安全传输。LDAP客户端认证是一个好的解决方案,可以带来足够的安全。

部署驱动的安全特性
CAS支持多种安全特性,他们可以通过多种安全策略实现。下面的特性由CAS的配置和客户端集成提供。很多特性默认不支持,需要额外安装。

Forced Authentication(强制认证)
很多CAS客户端和支持的协议支持强制认证的概念,用户访问一个特定的服务必须通过认证。CAS协议通过renew参数支持强制认证。强制认证在SSO会话的认证策略中提供了额外的保证,因为用户访问前必需通过验证TA的凭证。强制认证适合高安全性的应用。通常,强制认证配置是每个应用的基础。它可以和多阶认证结合使用。

Passive Authentication(被动认证)
一些CAS协议支持被动认证,当访问时可以匿名访问被CAS保护的服务。CASv2和CASv3协议可以通过gateway特性具有这个能力。被动认证补充了强制认证。

Proxy Authentication
Proxy认证或者delegated认证,为CAS提供了一种强大、重要、有潜力的特性。CASv2和CASv3协议支持Proxy认证,它们通过proxy tickets在用户的支持下请求。服务为用户代理认证,通常用于服务不直接和用户交互的情况下。

然而,proxy tickets在那些接受proxy tickets的服务中引起了一些安全风险。(the list of services through which the end-user’s authentication have been delegated to arrive at the ticket validating service). Services can opt out of accepting proxy tickets entirely (and avoid responsibility for validating proxy chains) by simply validating tickets against the /serviceValidate validation endpoint, but experience has shown it’s easy to be confused about this and configure to unintentionally use the /proxyValidate endpoint yet not scrutinize any proxy chains that appear in the ticket validation response. 所以proxy认证要求合适的安全控制和谨慎的配置。如果不需要,建议禁用proxy代理组件。

以前任何服务都可以包含代理认证票据并且从它可以访问任何其他的应用。换句话说分布式的安全模型好于集中式的安全模型。服务管理工具提供了一些集中式的代理认证,可以通过一个设置启用和禁用。默认注册的服务是不授权代理认证能力的。

Multi-factor Authentication(多阶认证)
CAS提供了multi-factor认证的支持:全局的和分服务的。
全局的比较简单:在登录界面总是要求多个凭据,用户界面被修改为接受多个凭据和已经被配置为要求提供所有凭据的认证组件。

分服务的更复杂一些:
Levels of identity assurance (LOA) for credentials and groups of credentials must be established.
Security policy versus credential LOA must be established per service.
Service access policy must be configured via the service management facility.
The first two tasks are vital but outside the scope of this document. Application of service access policy via the service management facility is implemented by declaring the authentication handlers that must successfully authenticate credentials in order to permit access; for example, an LDAP authentication handler and an RSA SecureID authentication handler.

Since multi-factor authentication requires development of institutional security policy, advanced component configuration (and possibly custom component development), and UI design, it should be regarded more as a framework than a feature. See the multi-factor configuration section for detailed discussion of configuration concerns and implementation recommendations.

Credential Caching and Replay
The ClearPass extension provides a mechanism to capture primary authentication credentials, cache them (encrypted), and replay on demand as needed to access legacy services. While proxy authentication is recommended in lieu of password replay, it may be required to integrate legacy services with CAS. See the ClearPass documentation for detailed information.

Service Management(服务管理)
服务管理设施提供多个具体服务的配置控制,可以更改安全策略。并且提供一些中心和的安全策略支持。(注意CAS之前是支持分布式的安全策略模型的)。一些好的服务管理控制:

Authorized services
Forced authentication
Attribute release
Proxy authentication control
Theme control
Multi-factor service access policy

服务管理设施是由一个包括一个或多个注册服务的注册器组成的。每个都指定了下面的管理控制,服务注册器可以由静态的配置文件、Web页面控制。

Authorized Services(认证服务)
基于经验,强烈建议严格限制这个列表为已知的应用,否则可能会产生安全攻击的机会。

SSO Cookie Encryption(SSO Cookie加密)
一个ticket-granting cookie是一个HTTP cookie,由CAS设置。标记着SSO会话的建立。这个cookie值默认由cas.properties文件中的定义加密和签名。每次部署必需重新生成。详见这个指导。

Ticket Expiration Policies(票据失效策略)
票据失效策略是安全策略中一个主要的机制。票据有效期策略允许控制SSO会话一些重要的行为:

SSO会话时长 (sliding expiration, absolute)
Ticket 重用

看这一章获得更多细节导论,包括多种失效策略和配置指导.

Single Sign-Out(单点注销)
又可写做single log-out (SLO)。通过一个SSO会话主发布停止访问服务的期望,CAS服务被通知SSO会话结束。尽管这可以提高安全,但根本上并不会结束访问。下面的控制可以用来降低SLO带来的风险:

敏感服务要求强制认证
减少应用会话超时时间
减少SSO会话时长

SLO可以以两种方式实现:从CAS服务器(back-channel logout)或从浏览器(front-channel logout)。从服务器的话,SLO过程依赖SimpleHttpClient类有一个线程池:它的大小必需合适的定义来处理所有的注销请求。未被处理的注销请求会临时存储在一个队列里。队列的大小一般是全局线程池容量的20%. 这两个值是重要的设置,都不可以超过实际的容量。

Login Throttling(登录限制)
CAS支持策略驱动的特性来限制登录的尝试次数,用来避免暴力攻击。详见这个章节。

Credential Encryption(凭证加密)
一个开源的产品叫做Java Simplified Encryption,允许你在运行期间替换文件中的明文密码Jasypt可以被集成到Spring配置框架中,所以当配置文件加载的时候它的属性值可以被读取。Jasypt’s approach replaces the the property management technique with one that recognizes encrypted strings and decrypts them. This method uses password-based encryption, which means that the system still needs a secret password in order to decrypt our credentials. We don’t want to simply move the secret from one file to another, and Jasypt avoids that by passing the key as an environment variable or even directly to the application through a web interface each time it is deployed.

这个能力非常好,因为它不需要把明文凭证放在配置文件中,并且允许适配者安全的跟踪所有加密的设置,安全的和其他人共享配置。敏感的数据仅限制在部署环境。

CAS Security Filter(安全过滤器)
The CAS project provides a number of a blunt generic security filters suitable for patching-in-place Java CAS server and Java CAS client deployments vulnerable to certain request parameter based bad-CAS-protocol-input attacks. The filters are configured to sanitize authentication request parameters and reject the request if it is not compliant with the CAS protocol in the event that for instance, a parameter is repeated multiple times, includes multiple values, contains unacceptable values, etc.

It is STRONGLY recommended that all CAS deployments be evaluated and include this configuration if necessary to prevent protocol attacks in situations where the CAS container and environment are unable to block malicious and badly-configured requests.

Security Response Headers
As part of the CAS Security Filter, the CAS project automatically provides the necessary configuration to insert HTTP Security headers into the web response to prevent against HSTS, XSS, X-FRAME and other attacks. These settings are presently off by default, and may be enabled via the following settings:

# httpresponse.header.cache=false
# httpresponse.header.hsts=false
# httpresponse.header.xframe=false
# httpresponse.header.xcontent=false
# httpresponse.header.xss=false
To review and learn more about these options, please visit this guide.

Spring Webflow Sessions
The CAS project uses Spring Webflow to manage and orchestrate the authentication process. The conversational state of the webflow used by CAS is managed by the client which is then passed and tracked throughout various states of the authentication process. This state must be secured and encrypted to prevent session hijacking. While CAS provides default encryptions settings out of the box, it is STRONGLY recommended that all CAS deployments be evaluated prior to production rollouts and regenerate this configuration to prevent attacks.

User-Driven Security Features
The following features may be employed to afford some user control of the SSO experience.

Long Term Authentication
The long term authentication feature, commonly referred to as “Remember Me”, is selected (usually via checkbox) on the CAS login form to avoid reauthentication for an extended period of time. Long term authentication allows users to elect additional convenience at the expense of reduced security. The extent of reduced security is a function of the characteristics of the device used to establish a CAS SSO session. A long-term SSO session established from a device owned or operated by a single user is marginally less secure than a standard CAS SSO session. The only real concern would be the increased lifetime and resulting increased exposure of the CAS ticket-granting ticket. Establishing a long-term CAS SSO session from a shared device, on the other hand, may dramatically reduce security. The likelihood of artifacts from previous SSO sessions affecting subsequent SSO sessions established by other users, even in the face of single sign-out, may increase the likelihood of impersonation. While there are no feasible mitigations for improving security of long-term SSO sessions on a shared device, educating users on the inherent risks may improve overall security.

It is important to note that forced authentication supercedes long term authentication, thus if a service were configured for forced authentication, authentication would be required for service access even in the context of a long-term session.

Long term authentication support must be explicitly enabled through configuration and UI customization during the installation process. Thus deployers choose to offer long-term authentication support, and when available users may elect to use it via selection on the CAS login form.

Warn
CAS supports optional notification of service access during an established SSO session. By default CAS transparently requests tickets needed for service access and presents them to the target service for validation, whereby upon successful validation access to the service is permitted. In most cases this happens nearly instantly and the user is not aware of the CAS authentication process required to access CAS-enabled services. There may be some security benefit to awareness of this process, and CAS supports a warn flag that may be selected by the user on the CAS login screen to provide an interstitial notification page that is displayed prior to accessing a service. By default the notification page offers the user an option to proceed with CAS authentication or abort by navigating away from the target service.

CAS安装要求

原文:https://apereo.github.io/cas/4.2.x/planning/Installation-Requirements.html

安装要求

Java >=1.7
Servlet 容器 >=3.0
Apache Maven >=3.3
熟悉Spring框架

Servlet 容器
CAS没有官方支持的Servlet 容器,但是Apache Tomcat是用的最多的。

Apache Maven
CAS使用Maven构建和部署安装包,也是在安装时强烈建议用来管理依赖的工具。 CAS从根本上是一个紧密集成的软件,(blablabla我实在懒得翻译这堆解释了,总之Maven很NB就对了),所以强烈建议使用Maven。

CAS架构

原文地址:https://apereo.github.io/cas/4.2.x/planning/Architecture.html

架构

CAS 架构图
cas_architecture

系统组件
CAS系统架构包含服务器和客户端包括两个部分,他们之间通过各种协议通信。

CAS服务器
CAS服务器端是在Spring框架下用Java写的Servlet,主要职责为通过分发和认证票据(ticket)认证用户和授权访问启用CAS的服务(通常来说叫做CAS客户端)。用户成功登录的话服务器端会发放一个ticket-granting ticket(票据授权凭证,简写TGT,下同),这时一个单点登录(SSO)的会话会被创建。当用户通过浏览器使用TGT当作令牌重定向的时候会拿到一个service ticket(服务票据,简写为ST,下同)。这个ST会在之后用于后续的认证,这个详细的认证过程会在CAS协议中详细描述。

CAS客户端
这里的CAS客户端有两层含义。任何一个启用了CAS并且和CAS服务器通过支持的协议交互的应用都是一个CAS客户端。为了可以通过一些认证协议(如CAS, SAML, OAuth)和CAS服务器交互的可集成到多种软件平台和应用的软件包也是一个CAS客户端。官方已经开发了支持多种软件平台和产品的CAS客户端。

平台:

Apache httpd Server (mod_auth_cas module)
Java (Java CAS Client)
.NET (.NET CAS Client)
PHP (phpCAS)
Perl (PerlCAS)
Python (pycas)
Ruby (rubycas-client)
Applications:

Outlook Web Application (ClearPass + .NET CAS Client)
Atlassian Confluence
Atlassian JIRA
Drupal
Liferay
uPortal
本文中出现的”CAS客户端”如果没有特殊说明,都代表可集成的组件(例如Jasig Java CAS客户端)

协议:
客户端可以和服务器端通过多种协议进行交互,所有支持的协议在概念上都是类似的,但可能有各自的一些特性。例如CAS协议支持代理认证(delegated、proxy),SAML协议支持属性分发和单点注销。

支持的协议:

CAS (versions 1, 2, and 3)
SAML 1.1
OpenID
OAuth (1.0, 2.0)

软件组件:
Web (Spring MVC/Spring Webflow)
Ticketing
Authentication

几乎所有的部署注意事项和组件配置都牵扯这三个子系统。Web层是所有外部系统交流的入口,它代理访问票据子系统为CAS客户端访问生成票据。单点登录会话开始于认证成功后TGT的分发完成。所以票据子系统经常代理访问认证子系统。

一般来说当SSO会话开始,认证系统才开始处理请求,虽然可能有其他情况可以调用认证系统(例如强制认证)。

Spring框架
CAS用了很多Spring框架,尤其是Spring MVC和Spring Webflow。 Spring为CAS核心代码和开发者提供了一个完整的可扩展的框架,这样可以通过配置扩展点很简单的扩展和自定义CAS的行为。懂得一些Spring的知识可以更好的理解框架中组件的关系,但这不是必需的。因为使用基于XML的方法配置CAS和Spring组件来部署、定制、扩展才是最需要关心的。 懂得XML的基础和Spring IOC Container才是安装CAS必需的。